Ciao & welcome to my food blog!! My name is Lisa & I grew up loving authentic Italian fare, being that is my heritage. However, as I expand my travels & restaurant cuisine types, I have found a passion for ALL foods! I intend to share my enthusiasm in this blog with cooking stories, recipes, pictures, and reviews of my eating out adventures! Most of which are done with my husband, Greg!

Please email me comments/questions/suggestions! BootyFoodie@gmail.com


Sunday, February 19, 2012

Texas Two-Step Soup


Greg's Aunt Claudia sent us 2 jars of Texas Two- Step Soup Mix for Christmas this year!! She had sent them a previous Christmas and we just fell in LOVE with the flavor... so you can imagine my excitement when I saw we got them again!!! Basically, it's a jar of all the dry ingredients with the recipe attached. In her recipe, you add ground meat, corn, and can of tomatoes....

Jar with Recipe
First, brown the meat, which I used turkey meat because I had some in the freezer, and then add the water and texas two-step soup mix. Bring that to a boil. Stir in the corn (I used just corn- not the can mixed with the peppers- since I already had it in the house) and tomatoes. Reduce heat, cover, and simmer for about 20-25 minutes- until the pasta is done. Serve with additional tortilla chips & cheese. 


The best part of this recipe is not only how simple and delicious it is, but how it can be modified to fit your own taste. You can add cilantro, beans, sour cream.. etc. etc..! I wish I knew what was in this dry mix, but I can only imagine googling it would be easy enough. I swear by these type of gifts!!!!! They are the best :)
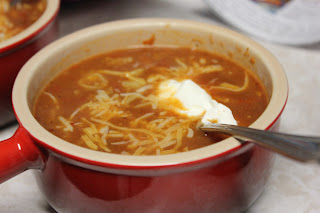
Soup with cheese & sour cream (wish you could see the soup better)

Saturday, February 11, 2012

Williams-Sonoma


Does anybody else receive the Williams-Sonoma magazine & drool over all the pictures of food cooked in their pretty pots? I DO! But one particular recipe caught my attention enough that I actually went onto their website to get the recipe! Layered Chicken Three Cheese Enchiladas mmmmm!

I have to admit it came out just the way I was anticipating... and if you like Enchiladas I hope it will be just as yummy for you!

right out of the oven!!
the finished product ready for consumption :)


Williams-Sonoma Ingredients:

1 Tbs. Olive Oil
1 yellow onion- diced
Salt/Pepper to taste
1 1/4 lb boneless, skinless chicken breasts, cooked & shredded 
1 3/4 cups red enchilada sauce
9 corn tortillas
3/4 cup shredded mozzarella cheese
3/4 cup shredded white cheddar cheese
3/4 cup yellow cheddar cheese
sliced green onions for garnish
chopped fresh cilantro for garnish

Booty Foodie's Modifications

I only used half an onion and I put more oil so the onion would cook down- I like my onions cooked well. I also bought rotisserie chicken, threw away the skin, and shredded the cooked meat. I have a bigger Le Creuset so I used about double the corn tortillas (just means I had more layers & more leftovers woohoo) . I personally don't think mozzarella cheese sounds good in enchiladas- so I decided to buy a mexican blend and cheddar and just alternate between those. Lastly I omitted the green onions and added olives and sour cream mmm :)

Directions:

Preheat the oven to 350 degrees. In a large saute pan over medium heat warm the olive oil and add the onion. Season with salt and pepper and cook until onion is soft. Remove from heat and add to the chicken. In your dutch oven (or baking dish) spread sauce on the bottom. Arrange 3 tortillas in a single layer on the sauce overlapping them as needed to cover the sauce. This is where you may need to adjust because of the size of your dutch oven or baking dish. Top the tortillas with about a cup of the chicken/onion mixture. Top the chicken with sauce then cheese. This is where I added chopped olives. Repeat with the rest of the ingredients and finish with sauce and cheese on top. Put in oven for 30-45 mins- til heated through and cheese is melted. Top with garnishes of your choice :) This recipe is very basic and there are many changes that could be made. Vegetarians can do a veggie or fish mixture instead of chicken... for those that prefer green enchilada sauce could substitute for the red... avocado slices could be added as a garnish... I could go on forever!!

Serve alone, with rice, or a salad.. nom nom nom!

Wednesday, February 8, 2012

Cooking Date with Fiona :)


Fiona is my SF friend that I have known just over 2 years... we instantly connected and now we are life long foodie date lovers <3! However, this was our first cooking date- it was long overdue :) 


Obviously, Fiona and I share many foodie stories and I have talked to her many times about the spicy Tuna Crispy Rice I enjoyed at Koi and Tao. When we made our cooking date, she immediately asked if we could attempt this recipe! I guess I talked about it THAT much, it was the first thing on her mind LOL!


The idea of this product is to have yummy spicy tuna chopped up sitting on a block of rice that is crispy & full of flavor! We were both shocked with our outcome- at least on the tuna side.. I could not believe how good it tasted and how similar to the restaurants! We did have a little problem with the rice... it had the seasoning we were going for- but it kept falling apart. Still thinking on a better way to do that or maybe make a rice bowl out of it instead? again, still debating....


As a bonus- I had bought some Shishito Peppers and we flash fried them for our appetizer... mmm delish and I highly recommend it! Literally just add oil to a pan and fry the peppers until charred on both sides!


Shishito Peppers Flash Fried
Our version of the Spicy Tuna Crispy Rice


Spicy Tuna: Mince the tuna as small or big as you want (can cube it). Mix tuna with the following ingredients. Put in fridge for about 20 mins or so to marinate. This allows the flavors to soak into the tuna but surface once it is time to eat it!


6 ounces minced sushi grade tuna (I bought more than double because we were making this as a meal)
Dash of Sesame Oil
1 Teaspoon Sriracha- More if you want the heat- we definitely added more ;)
2 Scallions- Finely Chopped- I omitted this
1 Tablespoon Japanese Mayo- I was told Kewpie was the best so that is what I bought!


Crispy Rice: Heat the butter and soy sauce in the pan over medium high heat. When it is bubbling and hot, add the rice and sauté each side until golden brown. Top each piece of rice with some tuna. 


2 Cups cooked rice (sushi rice)
4 Tablespoons Unsalted Butter
Dash of Soy Sauce (I used more)


Garnish- Top each spicy tuna crispy rice with either a slice of jalapeño pepper or Shishito!


*Note about sushi rice- the way Fiona cooked the rice is below. Can put rice in between plastic wrap in order to harden and make into rectangles for frying. 


1. Rinse sushi rice until water runs clear
2. Cook as normal
3. Once done, mix the rice for 10 minutes allowing steam to be released. 
4. At this time also stir in the vinegar mixture: 
6 Tablespoons vinegar, 5 Tablespoons sugar, 3 Teaspoons salt. 


Koi's Spicy Tuna
Tao's Spicy Tuna